Staging an Entryway

Happy Wednesday!

An entryway should always be staged. It is the first impression that a potential buyer has when he/she walks into a home. There is a missed opportunity in some homes that I have seen to make a huge impact visually. An entryway that functions well helps the buyer envision how he or she would use the space. Sometimes entryways are small but with the right mirror or statement art they can draw in potential buyers as well. Larger entryways need more work and should be staged accordingly to their size.

Some tips for a well staged entryway

  • Keep it cluttered free-shoes, jackets, umbrellas,hats and purses should be stored away
  • Choose the right size console table or bench for the entryway-furniture pieces that are big can make a potential buyer feel cramped and too small furniture pieces in an expansive foyer can look awkward
  • Add a mirror or piece of artwork making sure the proportions are right for the space (the frame should be narrower than the width of the console table)
  • When staging I like to use baskets, books, plants and other props to make an impact.


Image Source

Image Source

Contemporary Entry1Martha O’Hara Interiors


Should You Stain Your Oak Floors?

Happy Wednesday!

Sometimes when you have existing oak floors you just can’t get past the idea that you don’t like the colour or how your floors look in your room with your existing paint colours or fabrics. Should you stain your floors if this happens.

When Scott and I bought this home we had red oak floors. I wanted to strip them and apply a clear coat or light stain. I had dark coloured floors in our last house and wanted a change. Scott wanted darker floors. Compromising during renovations is critical because it can be a stressful time. We agreed to disagree and our red oak floors were professionally stripped and stained. I love the floors we have now but the existing oak floors could have worked as well.

Red oak can be much more challenging to stain than white oak. It has pink undertones and the pink can vary depending on source location and the mill producing the wood. We hired a professional who combined his own mix. The overall result turned out great. I think red oak and especially white oak floors do look great in a room. Should you stain your oak floors? I would say no not always. Dark oak floors look beautiful but red oak and white oak are gorgeous as well. Choosing the right paint colours and including the right fabric and textures can make red oak or white oak floors look amazing in a room too!

Kitchen Oak FloorsImage Source

Family Room Oak FloorsImage Source

Living Room Oak FloorsImage Source

Oak Floors and Grey Painted Walls

Kitchen Oak FloorsImage Source


How to Finish a Basement

Happy Monday!

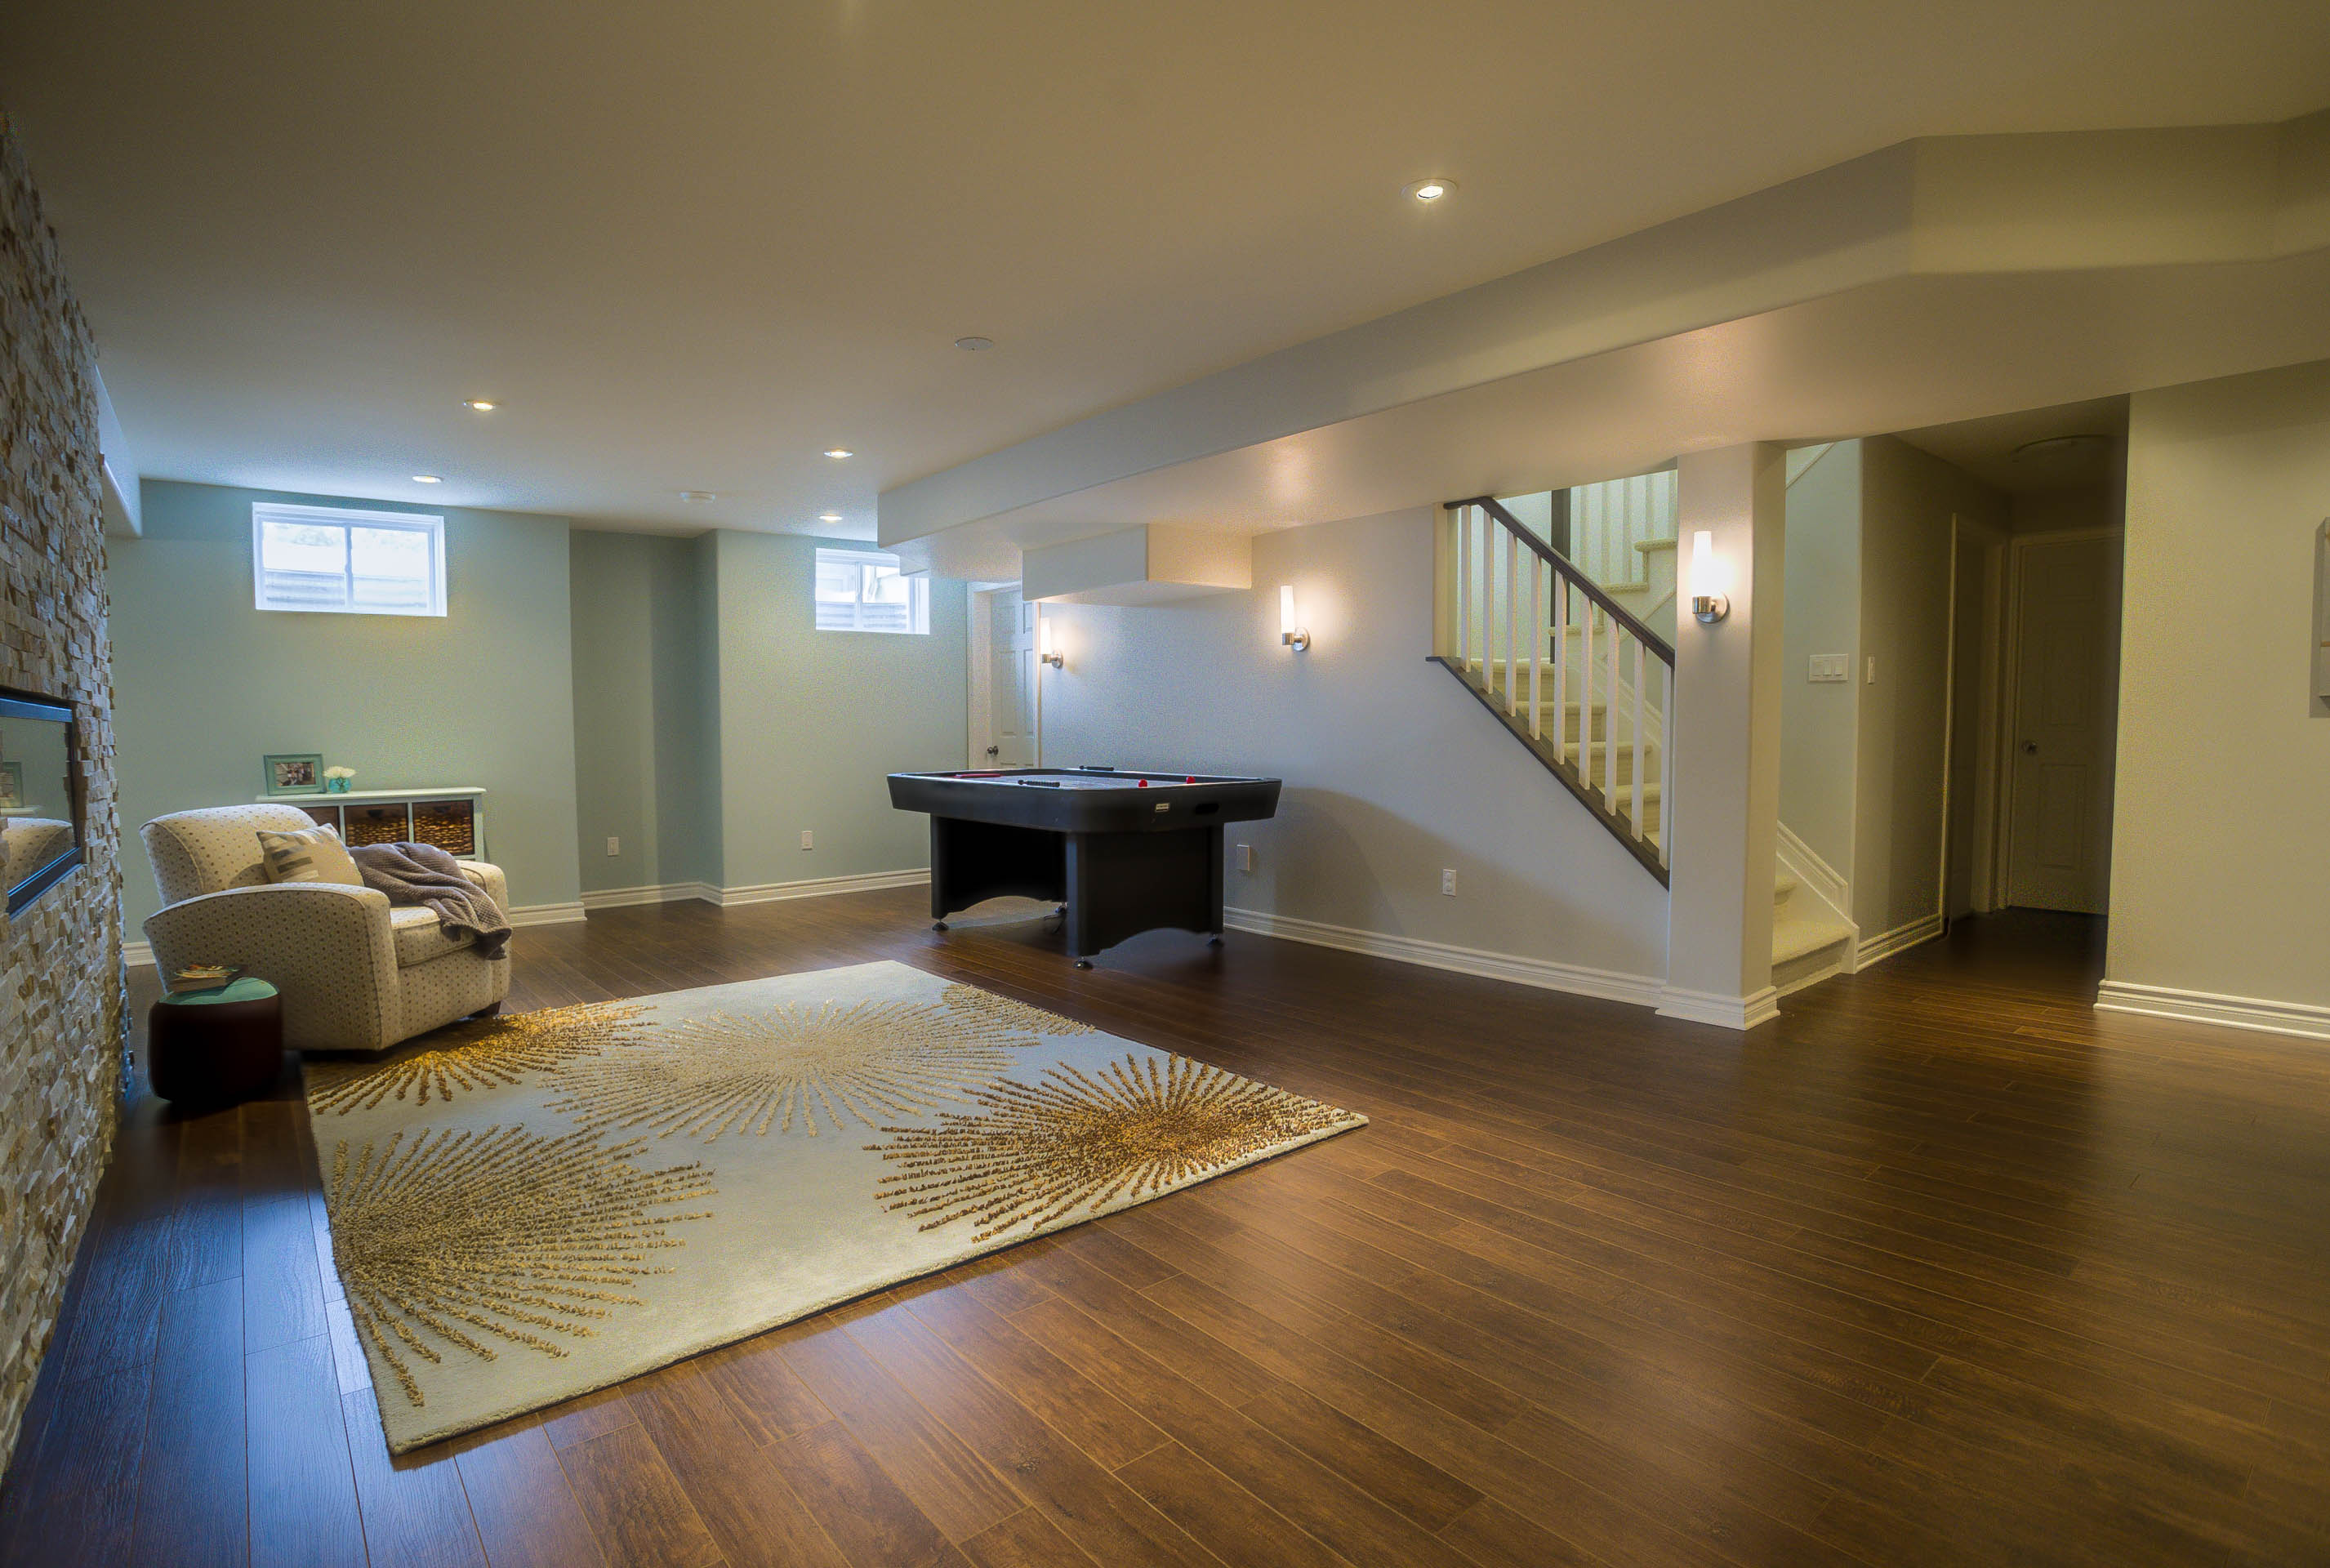
Finished Basement Hockey Table

Finished Basement Theater

One of the first rooms we tackled when we bought our house was our basement. I am glad we did as it has served us well. Our unfinished basement had many windows, high ceilings, and our electrical panel was basically new. This made things much easier and cost effective when we finished our basement.

I new I wanted warm colours in my basement and a feeling of coziness. High ticket items like an expensive wine cellar or bar was not on our list. We wanted a T.V with surround sound, a designated play area with games and bins and an open space to play with light-sabers, Nerf Guns and Lego. A fireplace was high on our list.

There are lots of things to consider when finishing a basement so you will need a plan. How you will be using your basement is really important. You might want an open plan, wine cellar, play area, work out area, game area………..you know what I mean! Also important is the style you want to achieve.

Things to Consider

  • You need required permits (electrical, plumbing)
  • Your foundation should not have any moisture problems. If it does you need to take care of them before starting anything
  • Do you need a sump pump?
  • Consider installing a backwater valve  backflow@Ottawa.ca (Backflow Prevention Program)
  • Hire a professional HVAC
  • Hire a professional Electrician
  • These are just a few things to consider, older homes may have other issues (Asbestos) you need to hire professionals that know what they are dealing with. To keep costs down we painted, Scott installed the cultured stone, added the speaker cables and speakers. Scott installed the flooring and installed some light fixtures. He did most of the framing as well. Doing some of the work ourselves saved us a lot of money.

Where to Buy

  • Lights – Lamps Plus
  • In-wall Speakers – Monoprice
  • Interior Doors,Transom Windows, and Trim – De La Fontaine

Colors

  • Revere Pewter – BM HC172 (Used only 1/2 strength)
  • Palladian Blue – HC144

Laminate Flooring is a Great Option for Basements

Happy Friday!

Laminate Flooring

Laminate flooring is a great choice for all the running around, eating and playing that happens in our basement. Toys have been dropped, popcorn has been spilled and Nerf Gun bullets have been blasted on our laminate floors. Our basement floors have to withstand an enormous amount of action!

Laminate flooring is manufactured but looks like wood.

I love looking at all the different colours, but thickness and whether it is click-lock are very important considerations.

There is a huge selection of laminate flooring to choose from in Ottawa. Buying cheaper laminate is not always better. North American Laminate Flooring Association (NALFA) is a label you should look at when buying laminate flooring. Products with this designation basically mean that they go through super stringent tests and meet or exceed formaldehyde emissions testing. These are the safest laminates to buy. The label CARB2 on a laminate box means that the product is manufactured anywhere (China) and has passed inspection for compliance with formaldehyde use.

Barwood Flooring in Ottawa sells NALFA designated laminates. We have bought from Barwood Flooring in the past and were pleased with their product.

Before Installation

  • Make sure the floor is clean and dust free
  • If you are replacing an existing floor remove the shoe moulding
  • Lay a vapour barrier down
  • Put under padding down if your laminate does not have it on the backside

During Installing

According to Scott “line it up and get it straight.”

See you Monday!


Contemporary Fireplace Featuring Cultured Stone Surround

Happy Wednesday!

Cultured stone can enhance any room with its beautiful texture and superb colours.

Scott installed cultured stone in our basement.This particular colour and stone has been popular at the big box stores here in Ottawa.We bought ours at Home Depot on sale. It really does make the basement look so much cozier. We finally decided on how we would use our basement and encased two jack posts that were in the middle of our basement with a fireplace. This allowed us to have separate spaces. One for play, tv watching and one space for our air hockey table. I think it compliments the basement colours and adds some depth to the room. We also have cultured stone upstairs. It has a completely different look giving our white walls some texture.  The price difference as well as the quality can be quite a lot different when comparing stone. A few places that we know sell beautiful cultured stone are Merkley Supply and The Fireplace Center in Ottawa. Other less expensive places to buy are Home Depot and Lowe’s.

What to know before you buy:

  • Interlocking stone is harder to install if the pieces are not uniform.
  • Rectangular stone is easier to install.
  • Spending more on a better quality stone can save on time and installation.
  • Most manufacturers recommend thin set with a wire mesh but SikaBond construction adhesive can be used instead. It is a glue that still remains flexible when cured.

Install

  • Leveling is critical as you build your layers. The first row needs to be leveled.
  • Layout your pieces so you have a plan before you start applying adhesive/thin set.
  • Take your time…….you do not want anything looking wonky!
  • Only do 4 to 5 rows at a time. You need time for adhesive to set.

Fireplace with Cultured Stone Closeup
Fireplace with Cultured Stone


Dining Room Painted Benjamin Moore Baby’s Breath

Happy Monday!

Dining Room with Baby's Breath

You have seen them in magazines, designers love them, design books and magazines feature them. There have been discussions about them and their origins date back many many years ago. I am talking about painted white walls. An example would be Benjamin Moore Baby’s Breath.

My dining room and family room are painted Benjamin Moore Baby’s Breath. I love it! Baby’s Breath is on the wall in my dining room but transcends and includes the ceiling as well. My eat in kitchen, dining room, and family room are open to each other and the wall colour spills cohesively from one room to another while complementing the kitchen wall colour. In the summer I love how it is a neutral backdrop to all the foliage, colour and greenery that filters in from the outdoors. The many pops of colour seem to make their way in through the large dining room windows. In the winter it is also an extension of the outdoors. I love how the twinkling lights indoor during Christmas makes it all seem like a winter wonderland with all the snow outside. It does not seem clinical or cold but rather really serene. Lastly, with work, family, running around and everything else in between I feel that I can “breathe” with this wall colour when I come home.

For our dining room makeover the “popcorn” ceiling was professionally scraped ( we had the entire first floor ceiling scraped) We painted BM Babys Breath right to and including the ceiling. The little bit of crown moulding around the room was also painted the same colour. I felt the crown moulding did not add any real significance to the room so we painted it as well.

What we learned

Having all the ceilings professionally sprayed on the first floor not only saved us a lot of time but the job when done looked amazing. In the past we have “rolled” the ceiling paint onto the ceiling, sometimes we have found you can see slight roller marks. Not with the ceilings we have now. They look sooo smooth!

Dining Room Alternate Angle with Baby's Breath

Dining Room - Before

Dining Room – Before

Where to Buy

Ceiling Lamp – Lamps Plus
Curtains –Ballard Designs
Table Lamp – Crate and Barrel
Art – Homesense

Have a wonderful day and see you Wednesday!


Affordable Kitchen Makeover

Happy Wednesday!

Today I will be writing about how we remodeled our kitchen on a budget, but before I do that here are the before pictures of our kitchen when we first purchased our home.

Kitchen Before Kitchen Table Before

This is how we remodeled our kitchen with an affordable budget.

Kitchen

White is still my favorite choice for kitchen cabinet colour. It is timeless and fresh looking and can look great with many styles. Painting the ceiling can really transform a room. I chose BM Harbour Haze at 50% strength. This paint colour on the ceiling makes the kitchen so much brighter, especially during our long winter months.

Kitchen Shelves

Many of my kitchen inspirations usually involve some form of open shelving. It makes the kitchen feel open and airy while still being functional.

Kitchen Table

What We Remodeled

  • Kitchen cupboards professionally painted (we painted the gables ourselves)
    • Paint Colour – Pratt and Lambert – Silver Lining
  • Painted the Walls
    • Paint Colour – Dulux – Pelican
  • Replaced all the knobs (Lowes)
  • Installed new light fixture above the kitchen table (Marchand Electric)
  • Replaced the light fixture above the sink (Restoration Hardware)
  • Added pot lights (Costco)
  • Replaced countertops (Lowes)
  • Scott tiled the kitchen backsplash (Costco)
  • Added open shelving (West Elm)
  • Added a range hood (Kitchenhoods.ca)

Finally in addition to all of the renovations I staged the kitchen!


Happy Monday

Before

After

Happy Monday and welcome to my blog! I will be blogging Monday, Wednesday and Fridays. I am starting out with the exterior of our current house. It doesn’t look like there was a lot of work done, but replacing the soil with better soil was a ton of work and sweat!!
The exterior of this home needed some work. We changed the light fixtures. We painted the garage doors. Re seeded the entire front yard. We dug up and made the flower bed much bigger. We also dug up the “bad soil” and added better soil from Make It Green in Kanata. A couple of years ago we added a maple tree. I just love all the colours in fall. The exterior stone pathway was removed. Scott removed the paving stones along with all the soil. He rented a small excavator from a local rental store. He added about eighteen inches of general aggregate, about two inches of stone dust, then compacted it. He used two fence post pipes and a four foot level to screed the stone to an appropriate slope. This is important because you want the water to flow away from the house.

I have picked out a colour for the front door called Gray Gardens by Benjamin Moore. See you all Wednesday!

Garage Door Paint – SW Repose Gray
Lights – Lamps Plus
Soil – Make It Green
Front Door Paint – BM Gray Gardens (CSP-55) (To be done soon…)


Privacy Settings
We use cookies to enhance your experience while using our website. If you are using our Services via a browser you can restrict, block or remove cookies through your web browser settings. We also use content and scripts from third parties that may use tracking technologies. You can selectively provide your consent below to allow such third party embeds. For complete information about the cookies we use, data we collect and how we process them, please check our Privacy Policy
Youtube
Consent to display content from - Youtube
Vimeo
Consent to display content from - Vimeo
Google Maps
Consent to display content from - Google